Purpose:
Use this guide to check PC compatibility, prepare Windows, and install the software for your SHINING 3D scanner. After installation, confirm that the software detects the scanner and follow the calibration instructions for your model.
1. PC Parameters & Initial Setup
Before downloading the installer, check the supported Windows version, processor, graphics card, memory, and storage requirements for your scanner and software.
System and Work Environment Requirements for Shining3D Products : Dental Support
2. Perform Windows updates
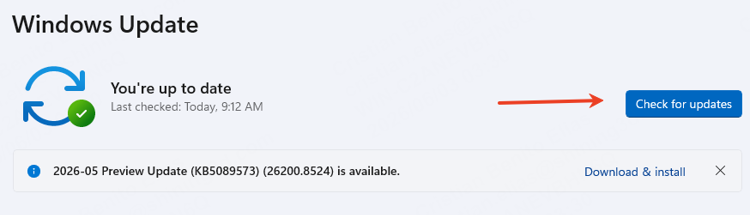
Open Settings → Windows Update, check for updates, and install the available Windows updates. Restart the PC if prompted. If an update fails, note the error code so IT or Dental Support can help.
For wireless scanners, check Windows Update again after installing the scanner software and connecting the device.
3. Security & Firewall Configuration
Check antivirus software:
Identify third-party antivirus or IT security software such as McAfee, Norton, or SentinelOne.
Certain softwares can interfere with optimal software use and block scanner detection/recognition due to the blockage.
If an IT team manages the PC/enforces a security policy, please have them reach out to Dental Support for assistance and clarification.
Note: New PC's can come with a trial period for certain softwares. Please check and uninstall if possible, else create exceptions/software allowlist.
Firewalls:
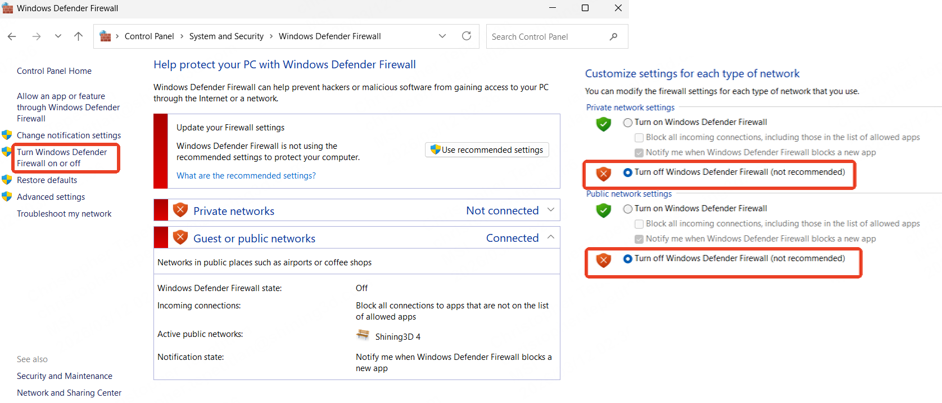
The SHINING 3D installer normally creates the required firewall exceptions. If the software cannot detect the scanner or connect to a service, check whether Windows Security or third-party security software reports a blocked application or connection.
If your organization manages the PC, ask your IT team to review the block and contact Dental Support for the appropriate allowlist settings. Keep antivirus and firewall protection enabled. Apply only the exceptions needed for the affected SHINING 3D application or connection.
4. Power Plan Optimization
Create or edit the power plan: Open Windows Power Options. Create a dedicated plan such as Scanner, or select High performance, to prevent reduced processing performance during scanning.
If you are using a laptop, connect it to AC power before scanning. If scanning is slow while the laptop is plugged in.
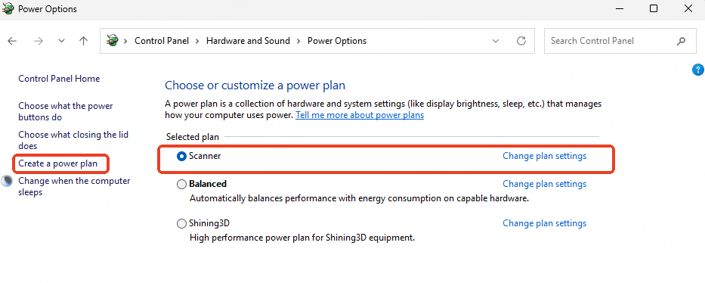
Open Advanced Power Options and set the following parameters:
(1) Turn Off Hard Disk After (a) Battery and Plugged in : 0 / Never (2) PCI Express (a) Battery and Plugged in : OFF (3) Processor Power Management (a) Minimum Processor State: (i) Battery: 5% (ii) Plugged in: 100% (b) Maximum Processor State: (i) Battery: 100% (ii) Plugged in: 100% (4) USB Selected Suspend (i) Battery: Disabled (ii) Plugged in: Disabled USB Selective Suspend lets Windows power down idle USB devices to save energy. Not available on all PC’s | 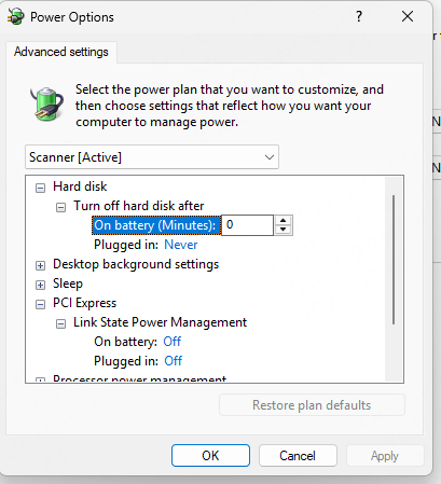 |
5. Graphics Card Driver & Configuration
Verify the current NVIDIA driver:
Open Device Manager > Display adapters, select the NVIDIA GPU, and review the driver date and version.
Note: NVIDIA releases new driver versions monthly. Recommend updating every 3 months for optimal performance.
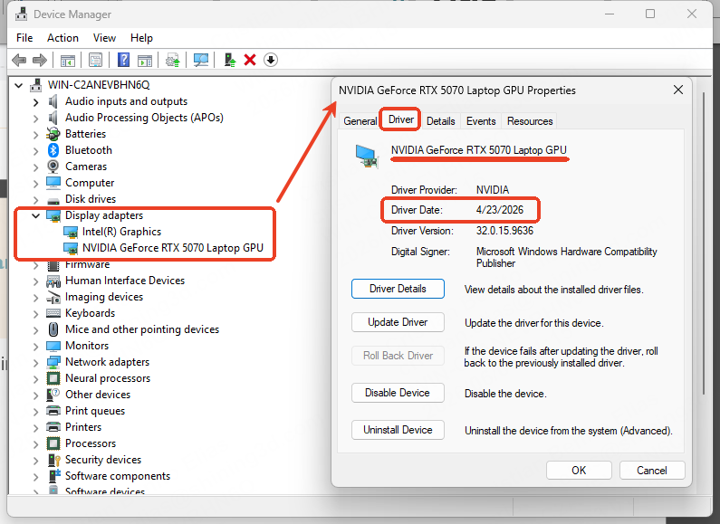
Download the NVIDIA Driver:
From the official NVIDIA driver page (Download The Official NVIDIA Drivers | NVIDIA), select the correct GPU and Windows version, then download the latest Driver.
Depending on NVIDIA Card, Studio and Game Ready Driver options may be available.
Studio Driver is recommended as it is more stable and tested.
Game Ready Driver is not as stable and can have performance issues.
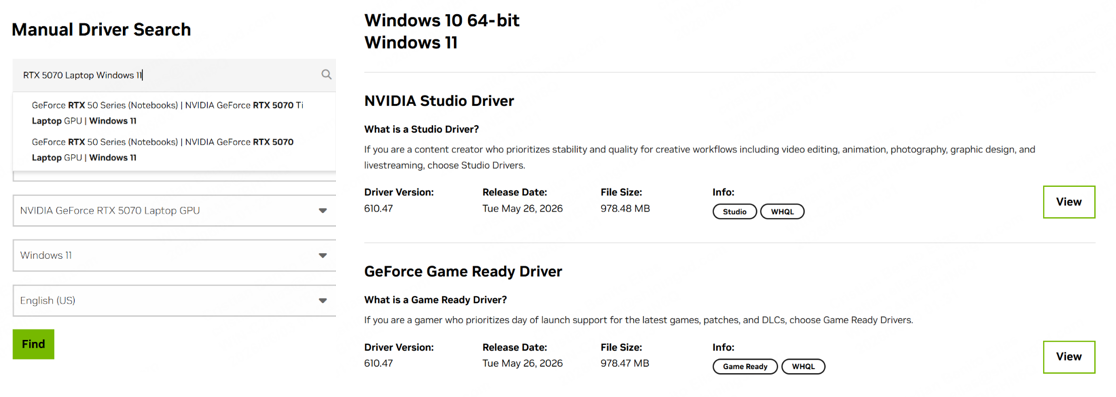
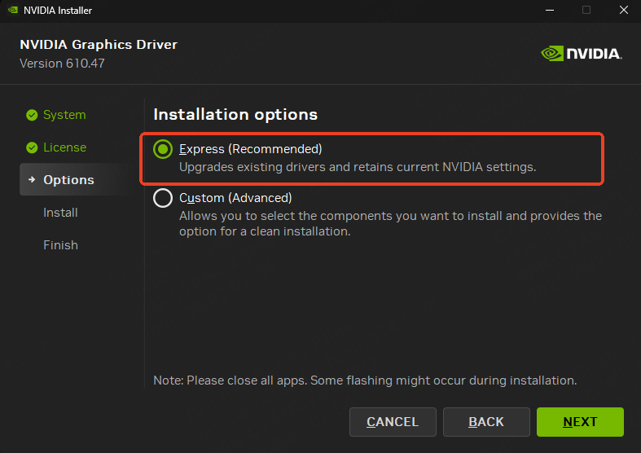
Install the driver: Run the NVIDIA installer and select Express (Recommended), unless the support workflow requires a custom installation. Click on agree and run installer as prompted.
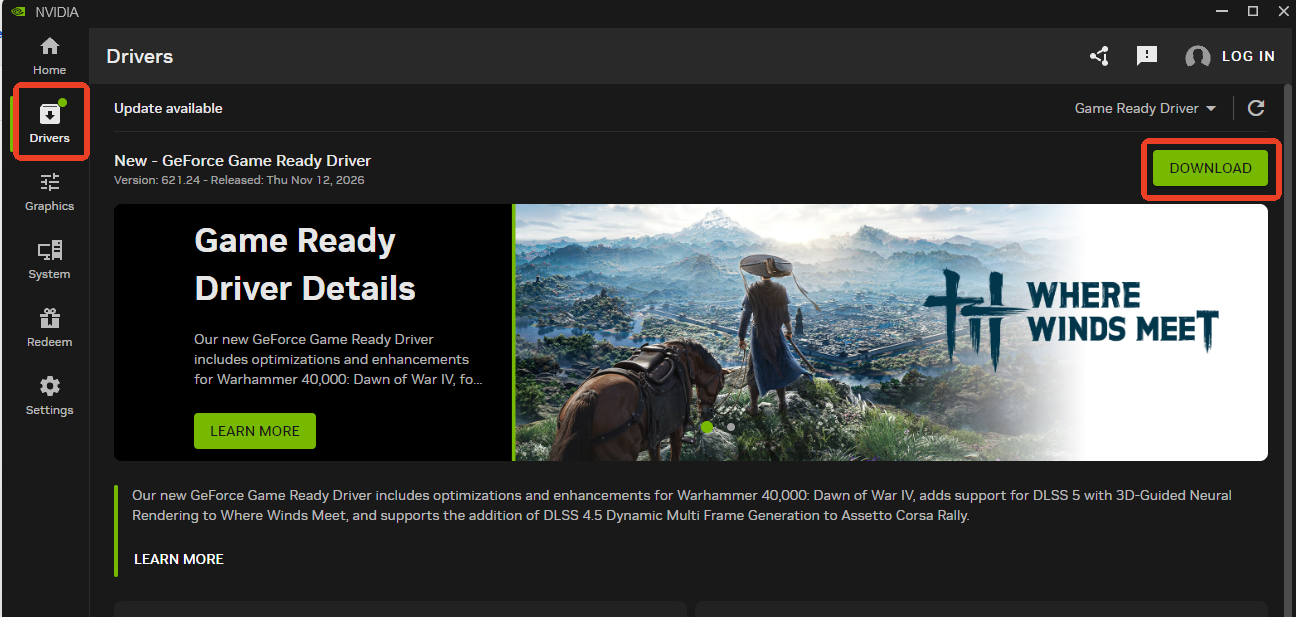
NVIDIA App:
Application can be used to keep graphics card up to date.
Open and click on Drivers, new driver releases will be shown on the top.
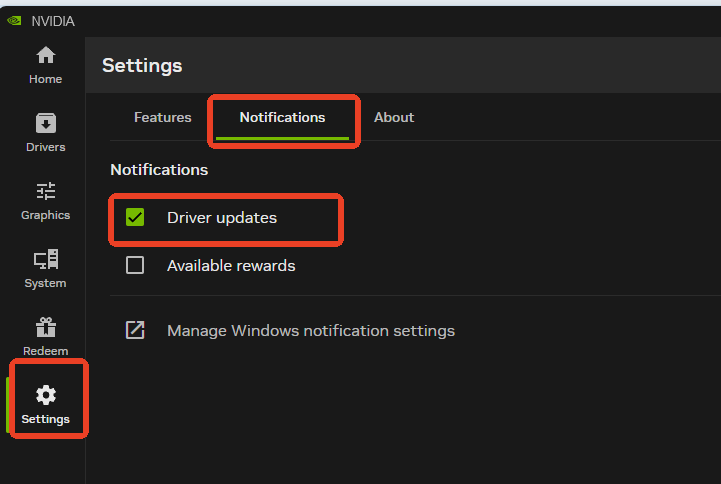
Additionally, Notifications can be adjusted to only show Driver updates.
Click on Settings → Notifications → Enable only for Driver Updates
6. Install Prerequisites
Install 7-Zip:
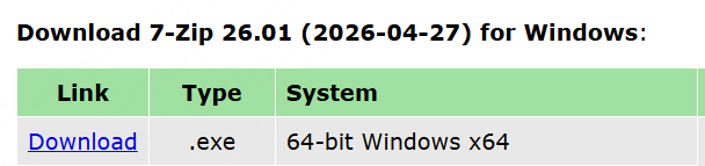
Download and install the x64 edition of 7-Zip for extracting the SHINING 3D installation package.
7-Zip can detect folder corruption and notify of issues. Redownload and extract again in case this occurs.
Install Microsoft C++ redistributables:
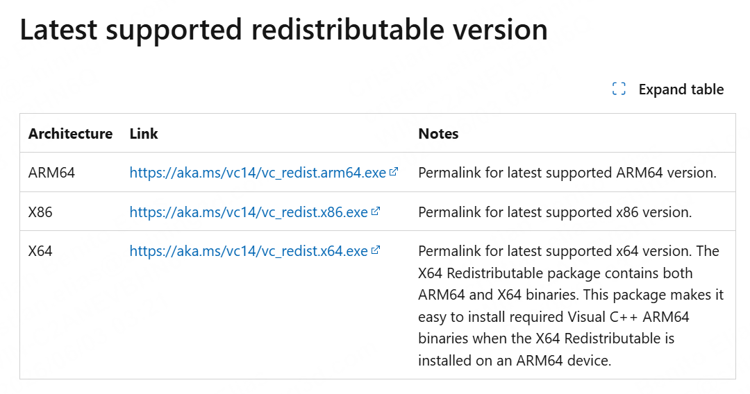
Download and install both the x64 and x86 Microsoft Visual C++ Redistributable packages so all required runtime libraries are available.
Latest Supported Visual C++ Redistributable Downloads | Microsoft Learn
The software installer may include a version of these shared files that was current when the installer was built. Updating to the latest supported packages provides newer compatibility fixes and can help resolve startup errors caused by missing or outdated runtime files.
7. SHINING 3D Software Installation
Download the correct installer:
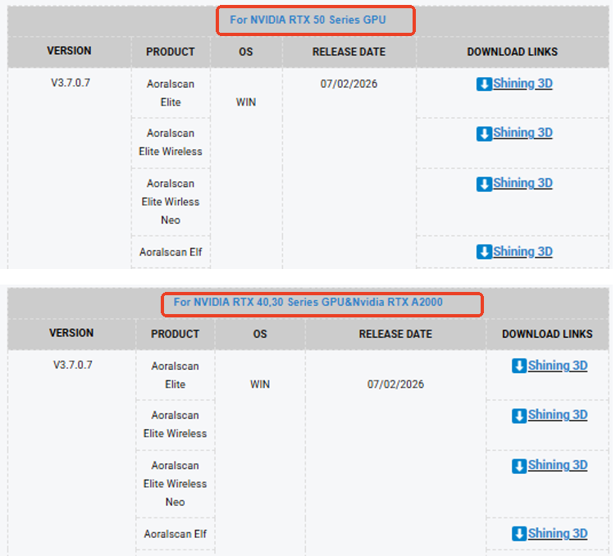
Download the appropriate SHINING 3D software package. Match the package to the scanner and computer hardware, including the RTX 50-series package when applicable.
Check Step 5 to verify graphics driver
Extract and install:
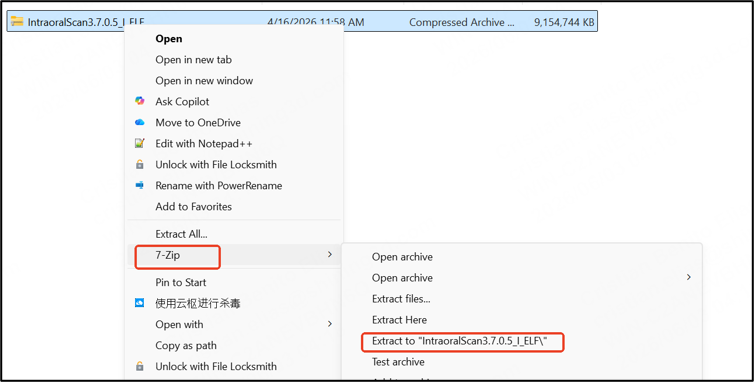
Use 7-Zip to extract the downloaded archive.
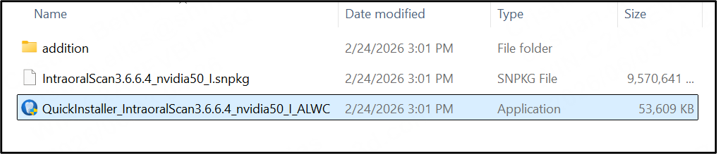
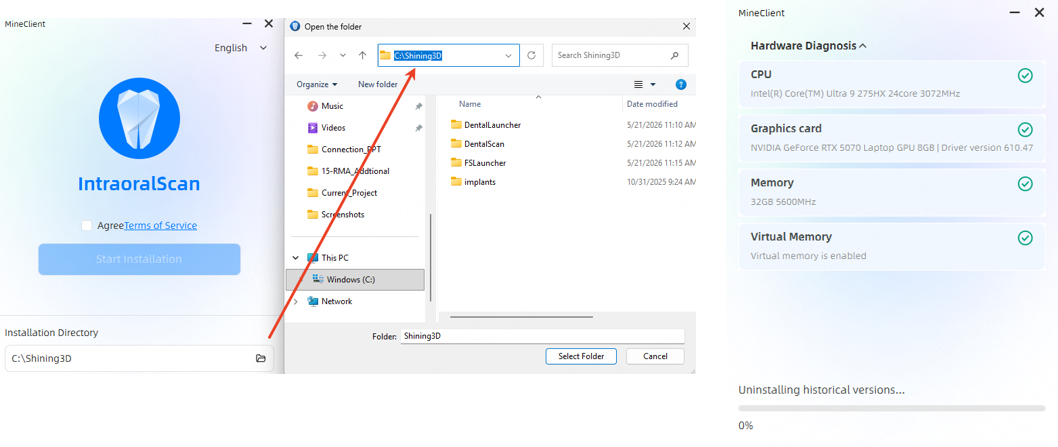
Run the .exe installer and select the approved installation directory.
Verify hardware diagnosis:
Review the installer hardware checklist. Change Path if needed.
Confirm that CPU, graphics card, memory, and virtual memory pass. Investigate any orange or red result before continuing.
Launch software:
Open Dental Launcher and confirm that it starts without crashing.
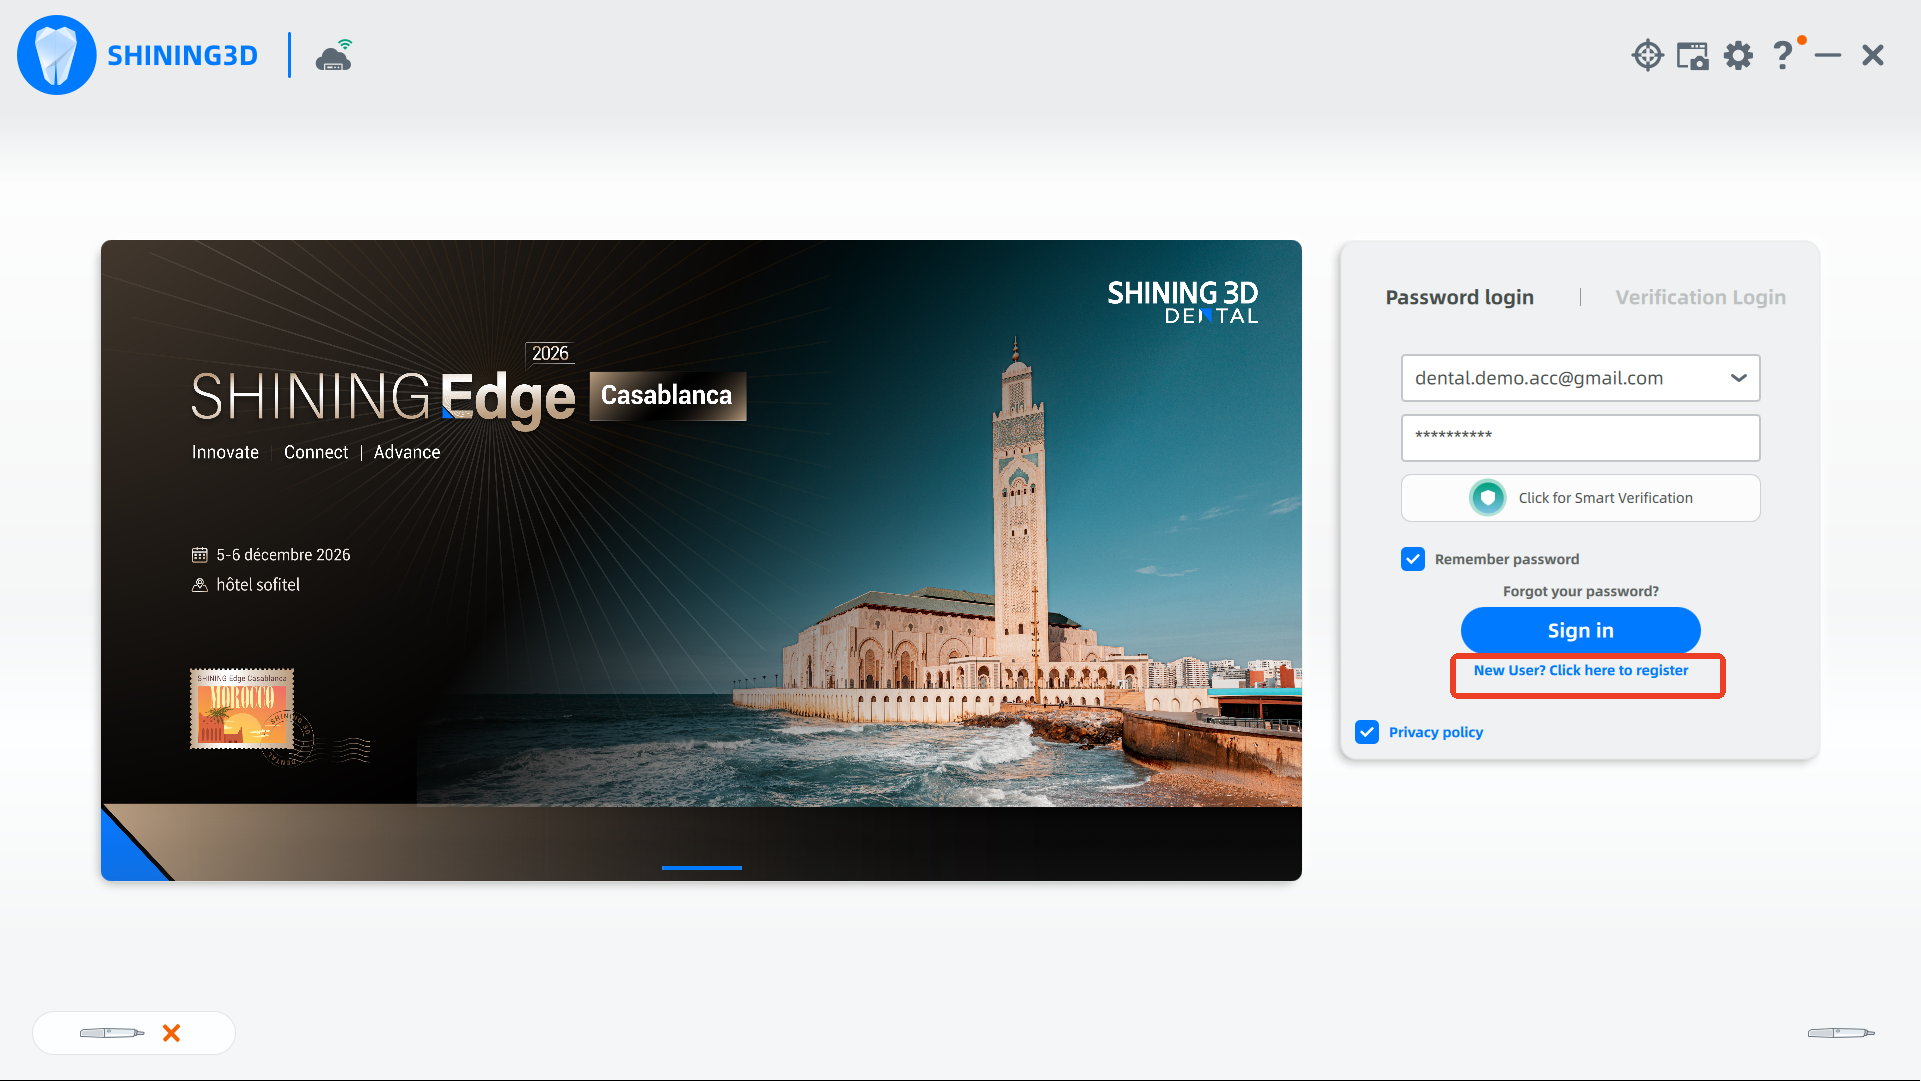
Log in or register:
Sign in with a Shining 3D dental cloud account using a password or verification code.
New users should select “New User? Click here” to register and complete the form.
Select the scanner model:
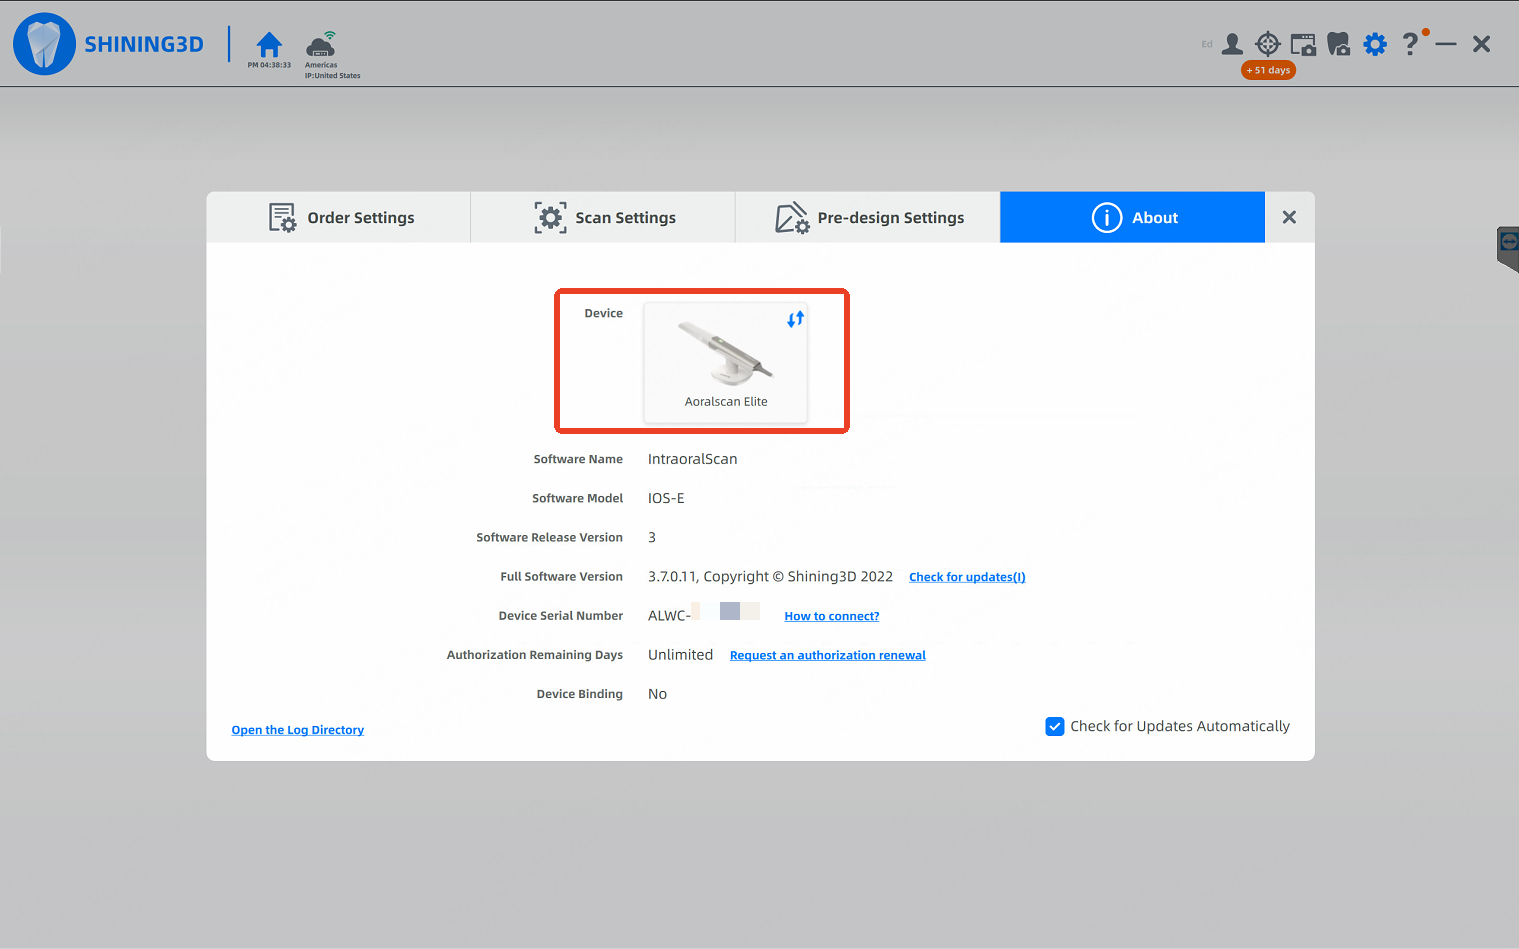
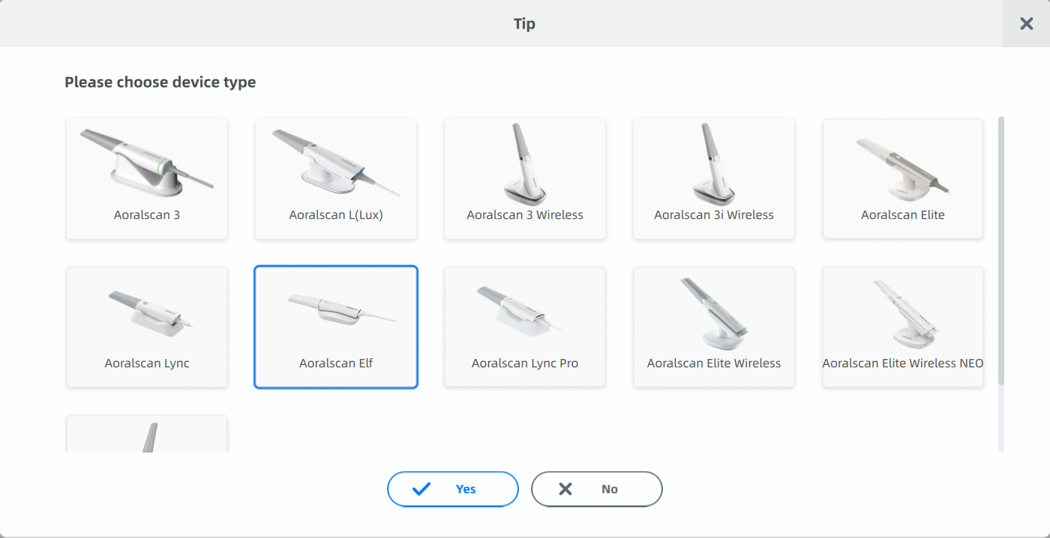
Open the software and sign in. Navigate to Settings > About and confirm that the correct Shining3D scanner model is selected.
Note: A small bubble will appear under the calibration button (Bullseye Icon) when a scanner is connected and detected.
If it does not appear, ensure proper scanner is selected as stated.
Activate device - first use only:
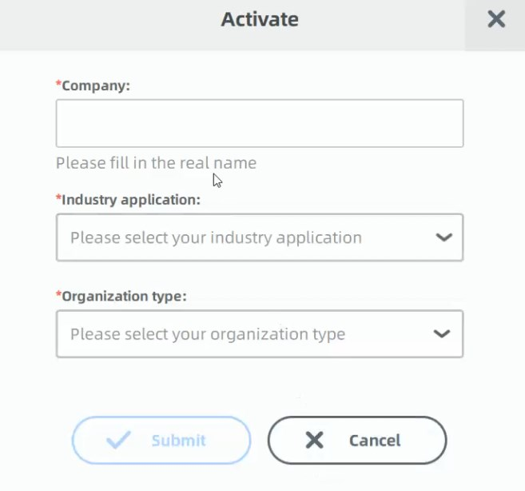
After login, connect the scanner. When the activation prompt appears, enter the facility information and select Activate.
8. Calibration
Once the software is open and the scanner is powered on, follow these steps.
Check when the scanner was last calibrated. Click the bullseye icon at the top of the software window. A small indicator below the icon shows when the last calibration was performed.
Green — Fewer than 14 days have passed since the last calibration.
Red — More than 14 days have passed since the last calibration. Calibrate the scanner before continuing.
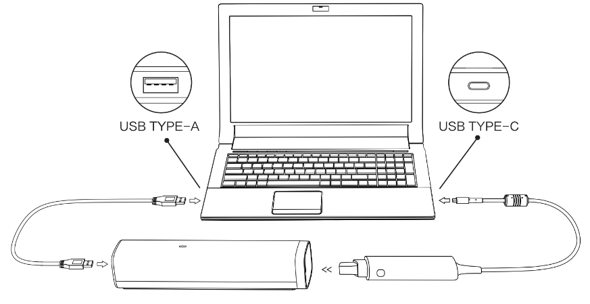
Check the scanner and calibrator connections. When the calibration window opens, make sure both the scanner and calibrator are connected and their indicator lights are on. The calibrator is powered by a USB-A to USB-A cable.
Run the calibration. Follow the on-screen instructions. Calibration takes approximately 3–5 minutes.
Calibrate every 14 days to maintain scan quality and scanner performance. We recommend keeping the time between calibrations to 30 days or less. For IPG cases, calibrate more frequently.
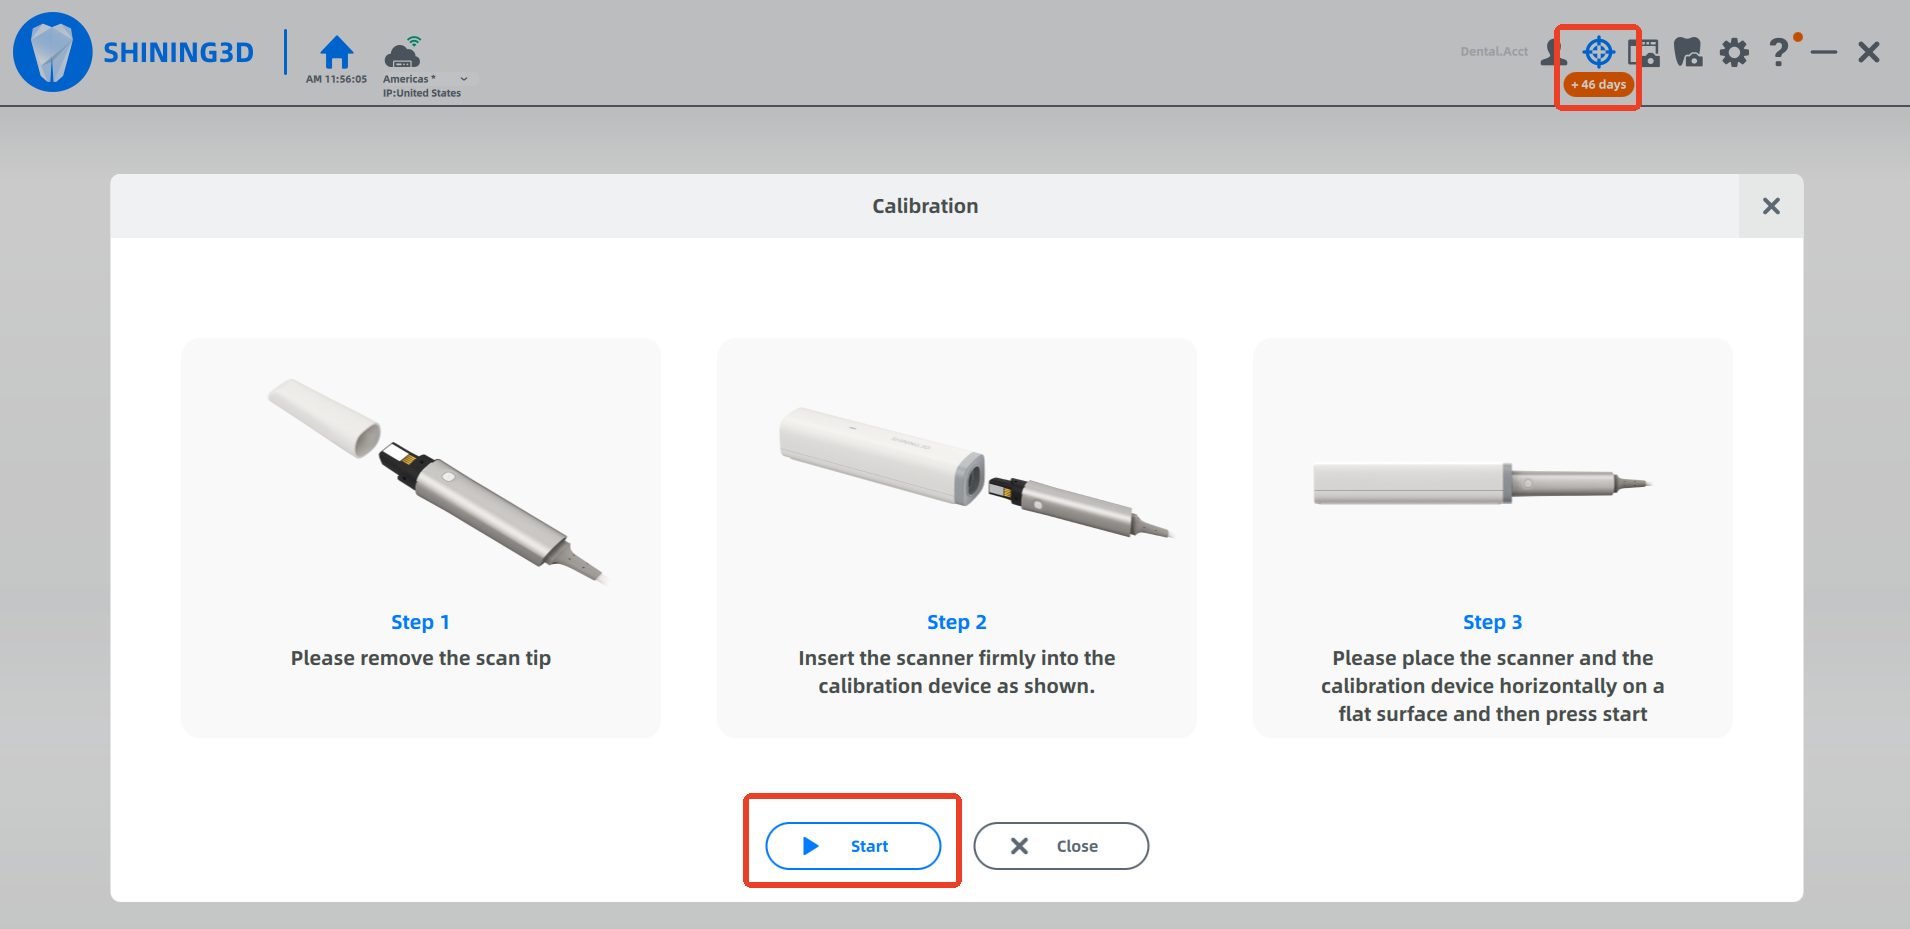
Example image for Elite scanner, please check user guide for your current scanner.