
The SHINING 3D Open Platform connects authorized third-party software to digital dental workflows. Depending on the approved scope, integrations can support case and order management, intraoral scans and 3D model files such as STL, automated file transfer, clinic-to-lab communication, design services, and workflows across multiple sites.
Organization types
- Clinic / Hospital — Connects its own clinical software, scanning, or case workflow.
- Lab — Connects its own lab system to receive orders and access scan files.
- Clinic / Hospital SaaS — Serves multiple clinics or hospitals. Each participating institution authorizes the app to access its data.
- Lab SaaS — Serves multiple labs. Each participating lab authorizes the app to access its data.
- Software Service Provider — Connects an approved third-party feature or service, such as CAD software, a design service, or an AI workflow.
1. Submit your integration request
Review the SHINING 3D NDA template. Send it together with the information requested to the support contacts found below. If you accept the terms, return your signed copy. If you are requesting changes, send an editable copy with your proposed revisions.
Required information
- Institution or organization name
- Main contact name
- Contact email
- Application or integration purpos
- Country or region
- Organization type. Choose clinic or hospital, laboratory, Lab SaaS, Clinic or Hospital SaaS, CAD or design software, design service or AI platform, or other.
Optional technical information
- Existing software or platform name
- Expected workflow, ideally with one example that shows who creates, sends, receives, or updates a case
- Types of files or data needed
- Estimated number of users or connected sites
- Preferred integration timeline, including target testing and launch dates if known
SHINING 3D reviews these details to confirm the integration scope and Open Platform institution type.
2. Complete NDA review and signing
Any proposed revisions to the NDA must be processed and reviewed internally by SHINING 3D before signing.
Once both parties have signed the agreed NDA and it is in effect, proceed to institution and application setup.
3. Set up your Open Platform application
You need an active application before developing against the online APIs. Choose the setup path that matches your institution.
One-click setup for a single lab or clinic
If you are integrating a single lab or clinic with an existing verified SHINING 3D Dental Cloud institution, sign in to Dental Cloud and select Institution → Third Party → Open your own application with one click.
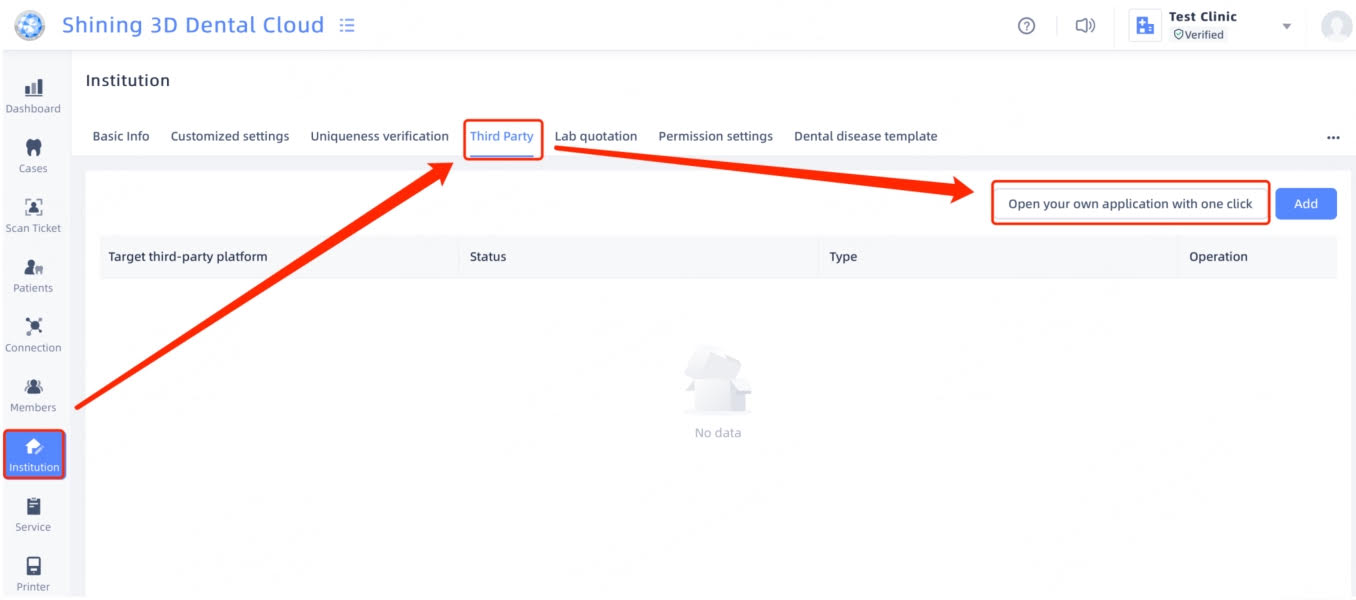
One-click activation registers the institution in Open Platform, creates the application, and enables the applicable APIs automatically. These steps require no separate manual review. Once the app is active, open the Open Platform Resource Center to find the API documentation and continue to development and testing.
Login credentials are the same for the Open platform as for Dental Cloud, separate account does not need to be created.
Standard Open Platform setup
Use this path for SaaS, software service providers, and institutions where one-click activation is unavailable.
- Sign in to SHINING 3D Open Platform. Use an existing verified Dental Cloud institution if it is eligible for the integration. If a new institution is needed, create it and submit the verification materials listed in the Open Platform Access Guide.
- Once the institution is verified, create an application under the confirmed institution type. Select the test or debug option, submit the application for review, and publish the test application once approved.
- Request access to the APIs needed for your workflow. If institution authorization applies, have the participating clinic or lab grant access to your app.
Before testing, confirm that your application is active, the required APIs are enabled, and you can access the intended test institution.
4. Develop, debug, and test your workflow
Use the Open Platform Resource Center for the API reference, institution-specific guides, and debugging tools. Verify authentication, the intended institution, and the regional API host for the test environment. Then run a representative workflow from start to finish using test data.
For example, a lab integration can retrieve a known test order, open its details, download the expected scan file, and verify that the file opens. If your workflow includes uploads, status updates, or notifications, test those actions as well.
5. Complete pre-release acceptance
Once the end-to-end workflow works in test, submit the workflow for pre-release acceptance. Share the scenario you tested, the expected and actual results, and any open issues. If changes are needed, address them and rerun the affected tests before proceeding to production.
6. Publish and verify production
After acceptance, follow the production publication steps for your approved integration. Verify your production credentials, API permissions, applicable institution authorization, and regional API host. Run one agreed production transaction to confirm the live workflow.
Open Platform documentation
Start with the Open Platform Access Guide. Use the Open Platform Resource Center to find the current institution-specific guides, verification requirements, application setup instructions, API reference, authentication and routing guidance, debugging tools, and release documentation.
Integration support contacts
Use the contacts below to submit your NDA and institution information or get help with Open Platform setup, API testing, or production release.
- Integration requests and NDA submissions
- Cristian Benito Elias · Cristian.Elias@Shining3D.com
- Jasmine · Gujiaming@Shining3D.com
Alternative Support Channels
You can also submit an initial inquiry through the Dental Support portal or email dental_support@shining3d.com. Both channels create a support ticket.
Once the initial institution and integration information has been collected, use the technical integration contact above for API follow-up, including app setup, testing, and production release.